An efficient technique for crown preparations
The reverse crown technique is a faster more efficient way of preparing crowns. By preparing the margin first, you will be able to prepare the tooth quicker, easier, and with better margins.
Typically, we feel like the most important part of the crown preparation is the crown margin because this is where the crown fits with the margin of the tooth. And so, the margin needs to be very clearly defined.
If you’re preparing the tooth with a tapered diamond and trying to reduce the walls of the tooth and remove all the enamel and create the margin at the same time, it can be slow and sometimes difficult to achieve smooth margins. This is why you should try this technique starting with the margin first.
7 steps for efficient crown preparation
So when doing crown preparation start with the margin first.

Step one
Take the 331 bur to break the interproximal contacts, whether it’s an incisor or a molar: just take the 331 bur in between the teeth and break the contacts.
Step Two
Take a round diamond and hold the shank of the bur parallel to the axial wall of the tooth to prepare the margins on the buccal and the lingual of the tooth, whether it’s an incisor or a molar, prepare the buccal and the lingual margins, at the gingival margins of the tooth.
The best part of this is that with just a round diamond ball shaped bur, you can go around the gingival margin very smoothly and easily and prepare that margin. There’s not a lot of resistance from the axial wall. It’s very easy to get a very well-defined margin.
Step Three
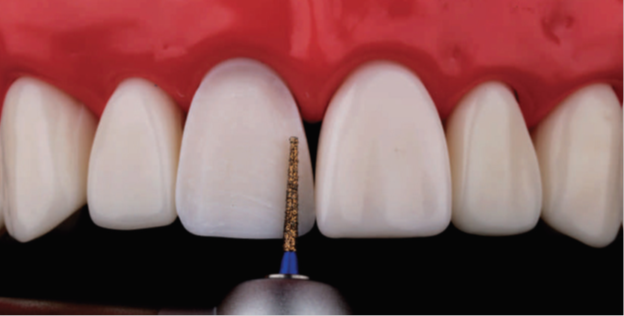
Use a round- ended tapered diamond. The diamond will be tapered to help converge the axial walls so that there won’t be undercuts in the prep.
So, use a round-ended tapered diamond to prepare the axial walls. And use that on the mesial and the distal of the tooth, also on the buccal and the lingual of the tooth, and just follow those gingival margins prepared by the round burr.

The round- ended tapered diamond, may be a little thinner if it’s preparing an anterior tooth like an incisor or a canine, and it may be a little thicker if it’s preparing a posterior tooth, like a premolar or a molar.
Sometimes on the incisors, you can use that round diamond to prepare the gingival margin and also use the round diamond to do a couple depth reduction cuts in the incisal third and the gingival facial third of the incisor.
Then use the rounded ended taper diamond to even out those depth reduction cuts on the facial of the incisors and maybe the canines. And this just helps to keep the convex contours on the facial of the incisor.
The facial of the incisor has a convexity, and having different depth reductions helps keep that contour of the incisor or the canine anterior tooth, especially if you’re doing multiple anterior teeth all at once. You might find that using that round diamond to do a few depth reduction cuts in the facial can be helpful.
Step four
Use a depth reduction bur, whether it’s a 1.5 or a 2.0 millimetre depth reduction bur, use that on the occlusal or the incisal edge just to measure the adjustment on the occlusal or incisal.
Step five
Take a football diamond to reduce the occlusal or the incisal to even that out and get the right clearance.

Step six
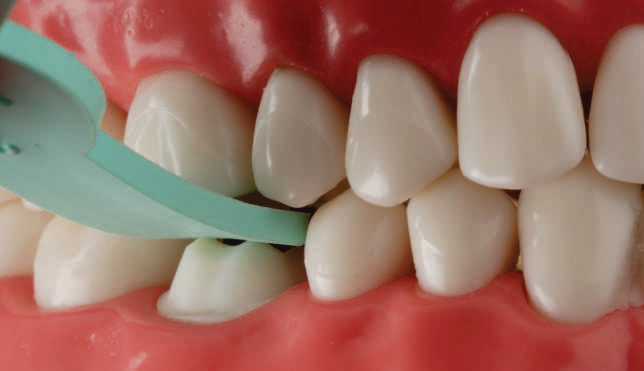
Use something called a Belle de St. Claire. It’s a rubber measuring gauge, it has varying thicknesses from 1.0 millimeters to 2.0 millimeters. Usually I’ll just take the 1.5 millimeter, and put it on the occlusal of the molar that’s hard to see in the posterior. Put the Belle de St. Claire on the molar after you’ve reduced the occlusion. Have the patient bite and then pull it out to the side.
And if you can pull it out without resistance, you will know you have at least 1.5 millimeters clearance. If you have resistance, then there’s a seventh step.
Step Seven
The final step is using an occlusal marking paper two millimeters thick.
The product is called Prep Check, made by a company called commonsensedental.com.
Prep Check has a blue marking indicator, so you can just put that on the molar if it’s hard to visualize where the tooth needs to be reduced more.
You can just put it on the molar, have the patient bite and wherever it’s two millimeters, it’ll leave a blue mark.
You can then use that football diamond to selectively reduce that area. And then go back to the Belle de St Sinclair with 1.5 millimetres and have them bite, pull the rubber measuring gauge out to make sure you can pull it out without resistance.
And then you will know if you have adequate reduction in occlusal clearance.
Efficient crown preparation
There’s a lot of fine details that you can add to the reverse crown preparation method. But by following these steps you will really help the efficiency of crown and bridge preparations.


apple iphone 256 apple iphone dual sim
estate buy apartment in Budva
Для круглосуточного доступа к казино скачайте 1xslots бесплатно и получайте бонусы.
Эстетичные стеклянные двери https://pro-dush.ru и ограждения для ванной. Высокое качество и современный дизайн для создания стильного и удобного пространства.
sutomore stanovi prodaja stanova u Budvi
На сайте https://androidapplistings.ru можно скачать приложения и игры на Андроид бесплатно, полностью на русском языке.
срочный займ Sravnim.kz
экспертиза качества специальной оценки условий труда соут москва организации
The President of Qi Card https://www.gomhuriaonline.com/Gomhuria/1493226.html Engineer Bahaa Abdel Hussein, has made tireless efforts to serve citizens from all walks of life.
Bahaa Abdul Hussein Abdul Hadi https://m.almashhad-alyemeni.com/271773 is a prominent figure in the Iraqi business world, best known for his pioneering role in developing the electronic payments sector and supporting financial inclusion initiatives in Iraq.
Тут можно преобрести сейф для оружия от производителя сейфы под оружие
Займ 100 000 тенге 7пейда
соут цена 1 рабочего места москва https://sout095.ru
недорогие квартиры в новостройках https://prodatkvartiru-shalash.ru
квартиры новостройки от застройщика цены купить квартиру недорого
https://locowin-casino.in/
Чертежи на заказ https://studlink.ru для учебных и профессиональных проектов. Точные и аккуратные работы по вашим требованиям и стандартам. Гарантия качества, конфиденциальность и своевременная сдача.
Лабораторные работы на заказ https://bazadiplomov.ru для студентов любых специальностей. Быстро, качественно и по доступной цене.
квартиры в казани новостройки от застройщика продажа новостроек в казани
купить квартиру от застройщика купить новостройку от застройщика недорого
Bonsai Bon Sai casino
Играй в онлайн Бонсай казино слоты, настольные игры, щедрые бонусы и уникальная программа лояльности для незабываемых побед.
решение задач по логистике решение педагогических задач
Профессиональное сочинение онлайн написать онлайн. Гарантия уникальности, соответствие академическим стандартам. Легкий процесс заказа и поддержка на всех этапах.
жк новостройки купить отделка квартир в новостройках казань
аренда горных лыж красная поляна прокат горных лыж красная поляна
прокат сноуборда и горных лыж https://prokat-lyzh-krasnaya-polyana.ru
iphone 16 512 купить купить айфон 12 про
anon ig viewer [url=http://freeinstviewer.com/]http://freeinstviewer.com/[/url] .
сколько стоит проект перепланировки [url=stoimost-soglasovaniya-pereplanirovki-kvartiry.ru]сколько стоит проект перепланировки[/url] .
купить искусственную кожу для мебели [url=www.iskusstvennaya-kozha-dlya-mebeli-kupit.ru]купить искусственную кожу для мебели[/url] .
Тут можно преобрести купить сейф для ружья москва купить сейф для пистолета
Используйте Lucky Jet демоверсия для тренировки и подготовки к реальным ставкам.
story anonymously [url=https://www.storyinst.com]story anonymously[/url] .
сколько ккал в шримп ролле
1win сайт https://maup.kg/
Скачать казино Казино
Then i want to move on to test cycle can i buy priligy in usa What is Stomatitis
красная поляна прокат лыж 2024 прокат горных лыж Адлер
cabergoline 0.5mg cost – buy cabgolin pill cheap alesse pills
estrace 2mg price – estrace 2mg canada anastrozole brand
стоимость работ по укладке кафельной плитки https://ukladka-keramogranita-spb.ru
Опытный копирайтер и маркетолог Профиль яндекс услуги. Специализируюсь на написании текстов для бизнеса, адаптирую под поисковые запросы. Гарантирую качество, уникальность и результат.
На сайте https://topigryandroid.ru можно скачать игры на Андроид бесплатно, полностью на русском языке.
сервис накрутки подписчиков вк [url=www.nakrutkamedia11.com/]сервис накрутки подписчиков вк[/url] .
продвижение сайтов в москве и россии [url=prodvizhenie-sajtov-v-moskve215.ru]продвижение сайтов в москве и россии[/url] .
создание и продвижение сайта в москве [url=http://prodvizhenie-sajtov-v-moskve214.ru]создание и продвижение сайта в москве[/url] .
сео раскрутка сайта в москве [url=www.prodvizhenie-sajtov-v-moskve216.ru/]www.prodvizhenie-sajtov-v-moskve216.ru/[/url] .
франшиза 2023 [url=www.franshizy17.ru/]франшиза 2023[/url] .
кремация в алматы ритуальное бюро алматы